
Progress Report, July 2015
Categories
Tags
Recent articles
Ubuntu 16.10 LXC host on ZFS Root, with EFI and Time Machine
How to connect any serial device to the internet
There has been so much going on over the last few months that updating this has been a chore I've postponed. However I've been chatting to a few other F-boat folk recently and have been startled to learn that people are reading this drivel and, worse, getting ideas from it.
I can't stress enough that the purpose of this blog is not to educate, but to serve as a warning to others. My ideas are untested and the boat may sink or catch fire when used in anger. The lighthouse marks the rocks, not the clear water. Terms and Conditions apply. I really don't know what I'm doing.
However it has prompted me to try and note what I've been up to. There's too much, so let me sum up:
Blog updates
- I've finished first of many notes on the electrical system
- My battery controller packed up so I've been unpowered for a month or so, grr.
- I've updated the lights article with the final design
Nets installed
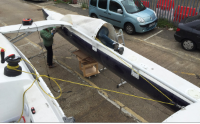 Collected the nets from Grant at GP
Sails near Southampton. Heavier than expected - I guess 20kg all up - and a perfect fit,
once we filed the slots in the net support tubes to feed them nicely into the slot.
The fit was
so tight we ended up using a turning block on the beams and the winch to feed them
into the
slot, and another block on the eye at the float bow to back them out when required.
Collected the nets from Grant at GP
Sails near Southampton. Heavier than expected - I guess 20kg all up - and a perfect fit,
once we filed the slots in the net support tubes to feed them nicely into the slot.
The fit was
so tight we ended up using a turning block on the beams and the winch to feed them
into the
slot, and another block on the eye at the float bow to back them out when required.
Mast aft support arrived
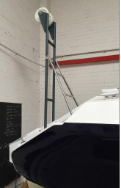
The aft support in steel and aluminium was ordered from Fusion Fab
in Lymington, and arrived despite the best efforts of the Couriers to lose it (top
tips for delivery
firms: do not turn up on the wrong day, and do not look up addresses on the internet
and add whatever
company name you find, as they may have left the premises two years earlier). A mere
three days and a
drive across London later this was tracked down and installed: I ordered the Castors
online (two of
these
and one of
these),
spaced out with a handful of 20mm plastic washers, and it all fits together very nicely.
It's supported by some custom gudgeon brackets laser cut from 2mm steel by these guys.
Mast arrived

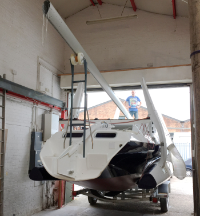
 The mast arrived! Thanks to a herculean effort by Uncle Gyles (no relation) we got
this spliced
and a test fit of the bottom half on the boat. It's a wing profile spar from Ballenger Spars in California, about 100kg all up and is
600mm longer than the diagonal of my building. Some ingenuity has been required to
allow me to
close the door - the base is pushed deep into one corner of the building, then the
front is winched
3m into the air (I've repurposed the mainsheet blocks for this, so it's at 6:1). The
roller doors
shut with about 50mm to spare!
The mast arrived! Thanks to a herculean effort by Uncle Gyles (no relation) we got
this spliced
and a test fit of the bottom half on the boat. It's a wing profile spar from Ballenger Spars in California, about 100kg all up and is
600mm longer than the diagonal of my building. Some ingenuity has been required to
allow me to
close the door - the base is pushed deep into one corner of the building, then the
front is winched
3m into the air (I've repurposed the mainsheet blocks for this, so it's at 6:1). The
roller doors
shut with about 50mm to spare!
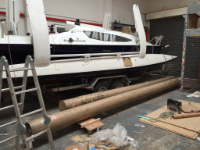
Mast base fitting
)
 This was harder than I expected. One unanticipated aspect of the centreboard design
is there's no
daggerboard in the dead centre of the boat to draw a reference from, and the mast
really, really
has to be centred. When every surface is curved, this isn't trivial.
This was harder than I expected. One unanticipated aspect of the centreboard design
is there's no
daggerboard in the dead centre of the boat to draw a reference from, and the mast
really, really
has to be centred. When every surface is curved, this isn't trivial.
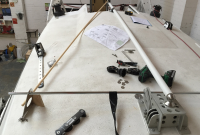
After some thought I decided to run some dyneema fishing line from the forestay base on the bow, back to the rudder pin at the stern and forward again to the pulpit. The two lines were tugged on to ensure they were dead tight and centered, and lining them both up from above to remove any parallax allowed me to identify the dead centre of the boat. In a fit of doubt I later confirmed this measurement by cutting a piece of wood to fit around the beams and they disagreed by no more than a couple of millimetres.
I then fitted the mast base, then the mast raising loops, then tried to measure length of the "gin pole side support lines" from the mast raising loops to the mast - the mast was not on deck, so I cut some wood to simulate. Two problems emerged - first, the loops were not quite parallel across the boat - I'd measured their position by aligning with the pivot on the mast base (the chromed pipe in the picture to the right), but I'd installed the base a mere 0.2° out. This translated into a 5mm difference in the length of lines on the port and starboard side. Doh. Filled holes and repositioned the loops.
 Second, the deck loops were supposed to align vertically with the mast base, but they
were too
high. I emailed Ian (first time I've had to do this) and within a few hours he'd suggested
raising the mast base to compensate. This I did by adding a 10mm UHMWPE plate under
the base and
refitting, which seems to have worked very well. I fixed that 0.2° offset too, although
on a
rotating mast I'm not sure it would have mattered.
Second, the deck loops were supposed to align vertically with the mast base, but they
were too
high. I emailed Ian (first time I've had to do this) and within a few hours he'd suggested
raising the mast base to compensate. This I did by adding a 10mm UHMWPE plate under
the base and
refitting, which seems to have worked very well. I fixed that 0.2° offset too, although
on a
rotating mast I'm not sure it would have mattered.
Hardware decisions: headsails
I got a nice deal on some Facnor headsail furlers for the Screacher and Spinnaker. The former should be on a 2:1 halyard, and as the Spinnaker will be furling on a torsion rope that will likely need a 2:1 too. A timely discussion on the F-boat mailing list threw up the fact that a 2:1 halyard is more inclined to twist and jam at the head of the mast, which isn't great, and that a 2:1 tack line was a better idea.
I hadn't planned to run a tack line, but I'd also been troubled by the position of the furlers way out on the bowpole. If something went wrong and I needed to retrieve these, the only way to do so from the boat is to retract the pole. A tack line would allow me to pull the furler back onto the boat, adjust as necessary and then tension the tack line to pull the furler back into position on the bow-pole. This idea is evolving but looking good. I also found some foot blocks with cams to run the continuous line for the furler through - the integrated cam means one less item to source and fit.