Hand-soldering SMD boards
 A quick note on how I'm doing this. SMT parts are pretty daunting to solder although
there are plenty of people on the net that will tell you it's way easier than through-hole.
After a dozen or so of these I think the truth is somewhere in between.
A quick note on how I'm doing this. SMT parts are pretty daunting to solder although
there are plenty of people on the net that will tell you it's way easier than through-hole.
After a dozen or so of these I think the truth is somewhere in between.
The image on the right has rollovers showing my setup - I made quite a few false starts
but now I'm getting pretty much 100% success rates hand soldering 0603 (and smaller)
parts -
the smallest to date is the LSM303DL compass, an LGA-14 part with 14 pins flush
under a 3x5mm package. Here's what I use
- Circuit boards - own designs, from oshpark.com
- Book of 0603 resistors and capacitors from ebay - varies depending on size, about £25 from various Chinese sellers. This
is a good "starter kit" and is a great way to manage loads of tiny components.
- A syringe of solder paste from ebay or amazon - varies depending on amount, I found one for £12. You don't
need much, and I keep mine in the fridge as (I believe) it doesn't like heat.
- Cheap magnifying glass
- Tweezers from ebay. Must be reverse action and should be suitable for watchmakers or jewellers.
About £10 for a set
- Cheap Hot Plate from ebay - about £10.
- SMD programming clip from ebay - about £10. I've also used a SOIC to DIP adapter - both are pictured below. The clip is cheaper and allows you to reprogram the chips
in situ, which is very useful, although it usually takes a few attempts to seat it properly.
If you buy a SOIC to DIP pay close attention to the width of the chip - ATTiny84 is
a narrow SOIC-14 chip, but the Attiny85 is a wide SOIC-8.
- LED light - you'll need something, room light is not enough, believe me
- Vice to hold boards for placement
- I also bought a gun-style non-contact IR thermometer for about £10 to work out how hot to set the hotplate. This is cheaper than scorching
your boards when you set it too high. Mine is set to about 230°C
- If you're putting the parts into a hostile environment - like, say, an ocean filled
with salt water - then a couple of coats of conformal coating is a good idea on the completed boards. £10 for a large can.
which is about £60, excluding the component book. And here's the process
- Put the board in the vice, squeeze an infinitely small amount of solder paste from the syringe roughly out over each copper pad.
- With a magnifying glass and a needle, go over the board and wipe away as much excess
as you can. This is the bit that wasn't mentioned elsewhere - other blogs would have
you believe you can just slather the board in paste and rely on the solder mask to
position it. Not so! The amount on each pin should be tiny, barely a wipe.
- Place each piece on the board using tweezers. Get it roughly right so the paste will
hold it, then rely on surface tension to pull it into place. This even works with
parts where the pins are hidden
- Lift the board oh-so-carefully from the vice and place on the hot plate which is already
at temperature. Wait about 10 seconds, the paste will melt and the components will
be pulled into location. Parts with more thermal mass (ie more metal, like USB connectors)
will transition last. Watch this under your bright light and magnifigying glass if
you're not sure.
- Lift the board oh-so-carefully from the hot plate, with tweezers, and put it down
on the worktop. Dropping the board to or from the plate is a really bad idea. You'll
have to start the process again at that point as the components are too small to identify.
Ask me how I know!
- Check under a magnifying glass for bridges. If you wiped away enough paste there shouldn't
be any
- Add any through-hole parts
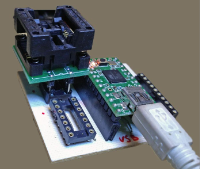
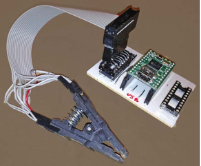 Programming the chips was done with my ATTiny programmer, with the SOIC-to-DIP converter stuck in one of the sockets, or the programming clip
- soldered to an appropriately sized DIP socket and piggybacked onto the programmer.
Programming the chips was done with my ATTiny programmer, with the SOIC-to-DIP converter stuck in one of the sockets, or the programming clip
- soldered to an appropriately sized DIP socket and piggybacked onto the programmer.
If you make any mistakes and need to remove a piece, the only technique I found that
worked was applying more solder - basically flooding the pins - and then moving a
regular soldering iron between the pins to heat them all up evenly. The key here was
thermal mass, the smaller parts dissipate heat too quickly so you have to add solder
to allow desoldering. I suspect some heated tweezers would be a good addition here.
For the results, see the images on the other articles. I'm pretty pleased, the results are superb and the process in the end is about the
same speed as through-hole.