
Fabricating, anodising and fitting backing plates
Categories
Tags
Recent articles
Ubuntu 16.10 LXC host on ZFS Root, with EFI and Time Machine
How to connect any serial device to the internet
 For high load items on the deck like cleats, winches etc. you really need backing
plates to put your
bolts through. I've decided to drill and tap aluminium plates where I can, partly
because it looks nicer
and partly because the lower profile and rounded edges of a finished plate are kinder
to your head when
it gets rough, or when you've nipped below to mix your eighth G&T. Or both I suppose,
if you're
hard enough.
For high load items on the deck like cleats, winches etc. you really need backing
plates to put your
bolts through. I've decided to drill and tap aluminium plates where I can, partly
because it looks nicer
and partly because the lower profile and rounded edges of a finished plate are kinder
to your head when
it gets rough, or when you've nipped below to mix your eighth G&T. Or both I suppose,
if you're
hard enough.
I struggled to find an authoritative source on the best way to do this, so thought I'd document my fumbling efforts here, if only to serve as a warning to others.
There are people using all sorts of rubbish, plastic chopping boards and so on, and putting taps into stuff like G10 laminate (largely superceded by FR4, which is the same stuff but fire resistant). I tried this, it took me under 10 seconds to destroy the taps by wiggling the bolt. If you're cleating to a mooring in a gale do you really want an old chopping board holding that cleat to the deck? No, I didn't think so. The notes I took boiled down to.
Those are my notes. Doing all this with tapped backing plates is a bit of challenge, first because aligning 4 (or more) bolts with enough accuracy into one tapped and drilled plate is much harder than doing each bolt individually into its own nut, and second because putting a steel bolt into aluminium in salt-water rich environment will lead to corrosion and stuck bolts.
I'm probably making a bit of a meal of this and if you're an experienced machinist or rigger, I apologise, but here's my approach - I'm only doing this for visible plates, everywhere else it's simply cut out of 12mm UHMWPE sheet, drilled through and fastened with Nyloc nuts.
-
 Cut out all the backing plates you'll need from 6mm 6061 or 6082 aluminium - so for
example, I'm fitting 4 cleats, so I cut 4 identical plates. ISO standard nuts should
be 80% of the diameter of the bolt thick, so for M6 bolts the nuts would be 4.8mm
thick. This is why I went for 6mm aluminium - I'm pondering what do do when I get
to M8 bolts, which require 6.4mm, although I suspect I'll probably just use 6mm.
Cut out all the backing plates you'll need from 6mm 6061 or 6082 aluminium - so for
example, I'm fitting 4 cleats, so I cut 4 identical plates. ISO standard nuts should
be 80% of the diameter of the bolt thick, so for M6 bolts the nuts would be 4.8mm
thick. This is why I went for 6mm aluminium - I'm pondering what do do when I get
to M8 bolts, which require 6.4mm, although I suspect I'll probably just use 6mm.
- Cut a piece of 18mm ply (or something hard and of similar depth to the core) to roughly the same size - this will function as a jig for drilling
- Run the plates through a grinder to smooth the edges a bit - my first effort was a bit shoddy but a bit of practice and keeping the grinding time on each side regular gives quite nice results.
-
 Position the hardware on top of one of the pieces and then mark the holes for drilling.
You might also want to mark the orientation of each piece with a scratch or notch
on the back side.
Position the hardware on top of one of the pieces and then mark the holes for drilling.
You might also want to mark the orientation of each piece with a scratch or notch
on the back side.
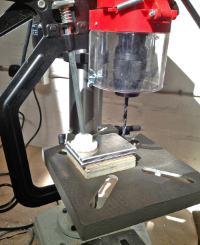
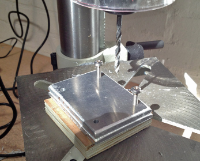
- Put all the pieces in a stack on the plate of your pillar drill, align and clamp firmly, then drill the first hole. I'm using M6 bolts, and I'm tapping the holes so I drilled a 5mm hole through all the plates and the ply.
- Put a bolt or similar into that hole to keep everything aligned, then drill the second hole. Add another bolt, and repeat for the remaining holes. Failing to keep these exactly aligned, or failing to drill the hole exactly vertical is a good way to waste a lot of aluminium - ask me how I know. If you don't have an accurate pillar drill don't even try.
-
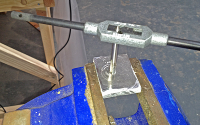 Tap the holes in the plates.
- You should now be able to bolt the hardware through the plywood to each plate. Test them all, if you can't then your drill holes weren't vertical and you want to find this out before you drill through your deck.
-
 Sand down the plates with a fine paper - I used 240 grain on a drill adapter, then
finished off with a rub with 320 grain by hand. I could still see some slight scratches
at the end of this, but I was past caring and as it turns out the pre-anodise etch
makes them a bit less obvious, and the dye helps even more.
Sand down the plates with a fine paper - I used 240 grain on a drill adapter, then
finished off with a rub with 320 grain by hand. I could still see some slight scratches
at the end of this, but I was past caring and as it turns out the pre-anodise etch
makes them a bit less obvious, and the dye helps even more.
-
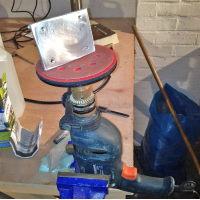
 Anodise. This is actually not hard to to at home, although easier to do buy buying
a kit (here's the one I bought from a UK
supplier). This kit came with instructions but there are loads of websites detailing
how.
it takes a few hours and you do want plenty of fresh air while you're doing it as
it will
create hydrogen gas, but the results are pretty good. Not hot-rod good, but good enough
for me.
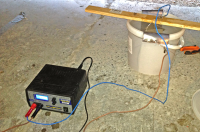
You'll need sulphuric acid, a 12V power pack with an ammeter, some aluminium wire,
lead plates,
a few plastic buckets, a metal pot and a hot plate (to boil the plate for sealing).
Anodise. This is actually not hard to to at home, although easier to do buy buying
a kit (here's the one I bought from a UK
supplier). This kit came with instructions but there are loads of websites detailing
how.
it takes a few hours and you do want plenty of fresh air while you're doing it as
it will
create hydrogen gas, but the results are pretty good. Not hot-rod good, but good enough
for me.
You'll need sulphuric acid, a 12V power pack with an ammeter, some aluminium wire,
lead plates,
a few plastic buckets, a metal pot and a hot plate (to boil the plate for sealing).
I'm anodising primarily for corrosion resistance on the screw threads, so also drilled a 1.5mm hole through the edge of the plate to hold the wire that will suspend the plate in the acid for anodising, because I was worried if I run the wire through the bolt holes they wouldn't anodise where the wire was in contact. I've no idea if this is necessary.
The only issues I've had is that I can't get much current through the anodising tank - I'm aiming for 1 Amp-minute / cm², a much easier way to remember 900 Amp-minutes / ft². So if my piece has 200cm² and I'm getting 1.2A while anodising, it's going to take 200 / 1.2 = 167 minutes. In practice that's roughly the time it seems to take. I'd also suggest anodising one piece at a time - the reason for this is if you have a bad connection on one piece, your current flow will be lower and the time calculation, based on the area of both pieces, will be incorrect. -
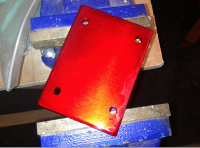
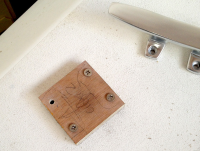
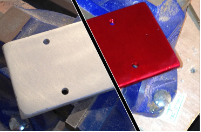 I dyed one of the plates red before fixing the anodise, to see how it looks - it's
good, and dying
hides my lazy sanding quite well. But I think the undyed plate looks better, particularly
against
a white ceiling.
I dyed one of the plates red before fixing the anodise, to see how it looks - it's
good, and dying
hides my lazy sanding quite well. But I think the undyed plate looks better, particularly
against
a white ceiling.
-
 Fitting to the deck. Position your jig, double check it's clear underneath then drill
a hole,
put a bolt through it to keep it positioned, drill the next hole and so on.
Countersink the hole slightly. Then the moment of truth - position the fitting, put
through some
bolts then tape the plate in place underneath and see if they're aligned enough to
thread.
Fitting to the deck. Position your jig, double check it's clear underneath then drill
a hole,
put a bolt through it to keep it positioned, drill the next hole and so on.
Countersink the hole slightly. Then the moment of truth - position the fitting, put
through some
bolts then tape the plate in place underneath and see if they're aligned enough to
thread.
I found I can usually get 2 or 3 bolts in but the others are a mm or so out - I tightened the aligned bolts and then widened the hole on the underside of the deck with file (or a drill) until I could thread a bolt through the plate and up through the deck. Rinse and repeat and you should have all four bolts positioned without too much effort. -
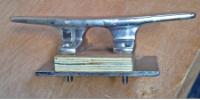
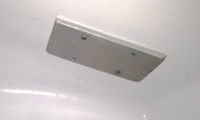 Final fitting - put a ring of sealant around the hole (I'm using Arbokol 1000 polysulphide sealant), some Loctite on the threads of the backing plate and
tighten. The results look pretty good I think.
The bolts have to go all the way through the plate for maximum strength.
Final fitting - put a ring of sealant around the hole (I'm using Arbokol 1000 polysulphide sealant), some Loctite on the threads of the backing plate and
tighten. The results look pretty good I think.
The bolts have to go all the way through the plate for maximum strength.
The whole process took a while, quite a bit longer than penny washers and Nyloc nuts. But it looks good, gets easier after the first one and by batching up the plates and doing something else while they're in the "anodising tank" (aka plastic bucket) then you're saving a bit of time too.
If you're not fitting through high-density foam you need to ream out some foam to make a column of hard epoxy for the bolt to pass through. The recommended way to do this is drill, ream out with an "allen key or bent nail in a drill chuck", tape over the bottom, fill with epoxy then re-drill once it's hard.
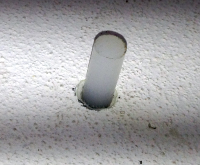 After the effort it took to position these plates I didn't fancy re-drilling, so took
another tip
from the Maine Cruising articles and
used a Dremel with a router bit to ream out the foam - a few seconds per hole and
very accurate,
there's no danger of damaging the fibreglass. Then I taped over the bottom of the
hole, squirted in
some epoxy from a syringe, and plugged the hole with some small bits of 6mm nylon
rod. Nylon doesn't
bond to epoxy, so the next day you just give the plugs a twist with your vice-grips
and they come right
out - you have a column of hardened epoxy and there's no need to re-drill.
After the effort it took to position these plates I didn't fancy re-drilling, so took
another tip
from the Maine Cruising articles and
used a Dremel with a router bit to ream out the foam - a few seconds per hole and
very accurate,
there's no danger of damaging the fibreglass. Then I taped over the bottom of the
hole, squirted in
some epoxy from a syringe, and plugged the hole with some small bits of 6mm nylon
rod. Nylon doesn't
bond to epoxy, so the next day you just give the plugs a twist with your vice-grips
and they come right
out - you have a column of hardened epoxy and there's no need to re-drill.
You can buy nylon rod from plastics suppliers very cheaply, and you can reuse the plugs. Top tip, if you're doing this make sure the tape on the underside of the deck is sealed tight over the holes after you push in the plugs, otherwise you'll be sanding drips off your cabin ceiling.